
There is now a PDF version of this blog post, presented as magazine article with all the text and photos formatted to fit each page. It looks great and is easier to read compared to scrolling down through screen after screen. You can download it here. Thanks to Marian Kersting for making it look so good!
Taking good photos of jugglers is easy… as long as they are juggling outside in the sun. The scene is bright, the juggler looks beautiful, the background of other jugglers is interesting, and the juggler will try the same trick many times over for you to capture them in a perfect position.

Taking photos of jugglers on stage is a much trickier business. For a start, it’s normally pretty dark, there’s too much movement, the background is a boring black curtain, and the juggler typically only does a trick once before moving on to something new.

Once I really hated taking photos of jugglers on stage. It was really frustrating that the photos always turned out blurry and boring. Then I worked out a few tricks, and suddenly I found it loads of fun. Why? The photos looked good! My new problem was that while I performed on stage, nobody took as-good photos of me. To solve that problem, here’s my in-depth guide on how to take good photos of Luke when he’s juggling on stage.
First, what not to do:
Don’t use a tripod! A tripod helps keep your camera steady, and that would be great if your subject was also totally steady. But jugglers move! Juggling props move! If the juggler or props are moving fast enough to become blurry, keeping the camera steadier helps you not-at-all.
Don’t use a flash! It’s a really stupid idea.
Don’t sit down! Unless your seat is in the perfect position, every single one of your photos will be compromised. And that perfect position doesn’t exist for an entire show. There simply isn’t a single position that will work for every juggler in an entire juggling convention gala show. More on positioning later.
Second, equipment:
- Lightroom from Adobe or Aperture from Apple
As stated in a previous blog post, the second most important piece of camera “gear” to buy (after a wrist strap) is Lightroom from Adobe or Aperture from Apple. I wrote: “by using the editing tools you get better results than the raw images from the camera. Obviously. I take many photos knowing I’ll do an edit in Lightroom. Nothing drastic, but I know I can rely on adjusting some parts of the image later.”

The most important thing in regards to this blog post is Noise Reduction. To put it clearly:
A noisy image is better than a blurry image.
Lightroom and Aperture are really, really good at getting rid of noise from your camera sensor, but no software can make a blurry image of a juggler into a sharp image.
Here’s an example of noise reduction in Lightroom from the Adobe website:

As you want to make the shutter speed fast enough to freeze a moving juggling club, and the aperture is going to be as wide as possible (more on this in a bit), the camera sensor is going to have to grab as much light as possible (high ISO). This results in noise… noise we can rely on Lightroom or Aperture to sort out later.
- A DSLR camera

Pretty much any DSLR is going to be good enough. I use a Canon 60D, but have taken many good photos with the 500D. A similar Nikon will do.
- A telephoto zoom lens.

I use a Canon EF 70-300mm f/4-5.6 IS. The “IS” stands for Image Stabilization. Not to go too in depth on this, but it kinda adds an extra stop of low light capability to the specs. All that means is that I can use a slightly faster shutter than I could without an IS lens.
This lens costs about 500 euro, and you can get waaaaaay better lenses if you are willing to pay waaaaaaay much more money. I’m not.
However, the 70mm angle is wide enough to fit a juggler into the picture, as long as they aren’t too close (more on positioning later). The 300mm end of the zoom is good enough to get a tight shot of a juggler’s face or pattern.
- Big SD cards.

Have large capacity cards. You’re going to be making lots of huge image files. You won’t have time to look through and delete them. You can do that later (or not), but not during the show.
Third, camera settings:
Keep in mind a good photo depends on how much light reaches the sensor. You can get more light by:
- Decreasing shutter speed – which makes stuff blurry.
- Increasing ISO – which creates more noise… but we can worry about that later.
- Increasing aperture size – which is good throwing the background out of focus.
So keeping these three functions in mind, I’ll take it in steps. Before you take any photos:
- Set the image format to RAW. This is SUPER important, as RAW images have all the sensor information you need to remove noise later, and hold way more information than a JPG, which we’ll also need for post processing later.
- Set the ISO as high as possible. Noise? Don’t worry, we can fix that later. And you’re not taking photos for printing on posters, only for sharing online, on Facebook and jugglers’ websites. Nobody is going to be zooming in on individual pixels.
- Switch the camera to Tv mode. The most important thing is no motion blur so we want to control for shutter speed more than anything else.
- Set the shutter speed to 160. From long experience, this will freeze most juggling props in the air. Juggling props swung in hands will still be blurry, as will whipped diabolos and pirouetting jugglers (humans can move far faster than props in the air).
- Set the exposure compensation to -1. This means it is less likely that any bright or white areas will be over exposed. It also means the light information lost will be the dark stuff. The dark stuff includes the black curtain behind, the empty spaces beside the stage, the lighting rig, etc. In other words, all the stuff that isn’t important. However, much of the time it’ll be so dark the camera will automatically open the aperture as wide as possible anyway, so the -1 setting won’t have any added effect.
- Set the drive to continuous, but slow continuous. There’s no need to snap nine or twelve photos a second. Three per second is enough.
- I put the autofocus on AIFocus. Not sure why, but this seems to get the best results for juggling on stage.
- I put the metering to Evaluative Metering. Spot metering is too precise as a juggler won’t always stay under your focus point. Center weighted and partial metering isn’t always cool because a juggler isn’t always in the center, and the juggler is usually the brightest thing in the photo anyway. Nikons probably have different names for these settings.
That’s the setup! But I don’t leave them like that.
It’s usually dark, so the Tv mode opens the aperture as wide as possible. This is awesome, as I want them in focus and everything in the background out of focus.
What if it gets so bright on stage that the aperture starts closing down? I don’t want the F number to climb as high as 8 or 9. In this case, with a single flick of my finger, I’ll take the shutter speed up to 250 or 320. The juggler will now be even sharper in terms of motion blur, and the background will still be out of focus.
If there are two jugglers on stage, and I want them both in focus, I need to make the aperture smaller. I sometimes switch to Av mode to do this, but reducing the shutter speed can do the same thing in Tv mode, and the result is the same, mechanically. I just need to keep in mind that the two jugglers can’t be moving too quickly.
If the lighting gets even better for a longer stretch of time, I’ll leave the shutter speed at 250 and then use a lower ISO setting to force the aperture open. This makes marginally better quality photos.
If it gets darker? Well, I’m pretty much fucked. To avoid this problem I try the following:
- I organize the show myself, and tell the lighting technician to always make it as bright as possible on stage so everyone can see.
- I don’t try to take photos of French jugglers on stage. French jugglers try to be “artistic” and, unfortunately, mistake “dark” for “artistic”. Time and time again I’ve come away from French shows and French Open Stage acts with nothing but dark blurry blobs. Meanwhile the Germans and Japanese performing in the same Open Stage will have bright, colourful and crisp photos of their acts.
I use a combination of the two focusing techniques, both changing focal points in camera and focusing-and-reframing, to make my photos sharp. Just remember, focus on the face of the juggler, not the props. First, the face is the most important thing in the photo. Second, the face usually moves less than the props, so the autofocus will have a waaaaaay easier time getting it right.
Fourth, positioning:
For fuck’s sake, don’t sit in the front row to take photos. Really. It’s a bad spot to be. Really. You think it’s a good place, but you don’t know enough.
The most important thing in the photo is the juggler! Not the lighting rig, not the curtains, not the stage, but the juggler. I’ll explain with diagrams.

It’s all down to the angles. If you use a wide angle lens and are close to the juggler, you will include loads of crap in the photo which is just distracting. Here’s a photo where I intentionally included a lot of the background:

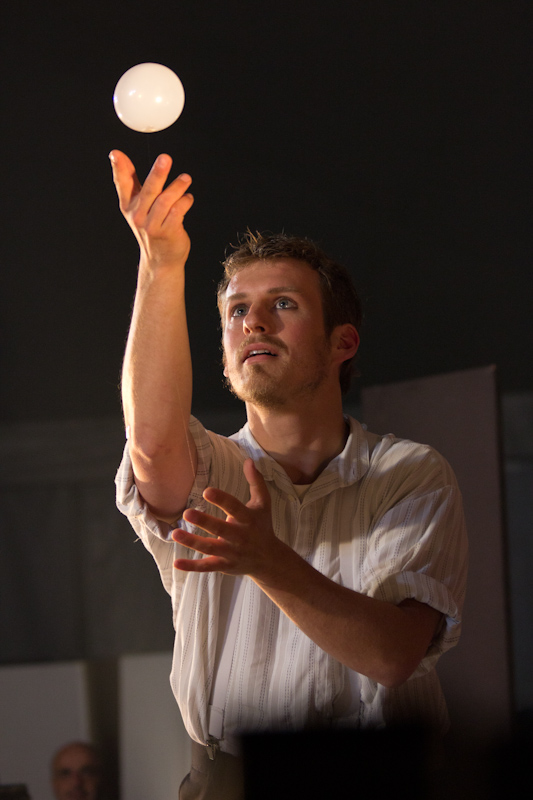
And now, from the same act, taken a few seconds before, where I excluded as much of the background as possible:

In both photos Wes takes up around about the same space, and both are taken at an “interesting” angle. But in one the focus is very much on Wes, and the other is very much about Wes being on a stage in a big top with lights shining on him. If you stay at the front of the stage and use a wide angle lens to fit in the whole juggler, you’ll never not have photos that focus on the venue itself rather than just the juggler.
Another reason to exclude lighting rigs is that a juggling ball and a stage light are both round objects, and it can be confusing as to what is what in some picture. Here’s a not very good example of what I’m talking about, again featuring Wes (look at the lights):

In this case I was actually sitting in a seat a long way from the stage, but as I couldn’t move from that spot (I was more interested in watching the show with my girlfriend than taking photos), I couldn’t exclude the lights from the image.
If you get further away from the juggler, and use a 70-200mm or 70-300mm lens to fill the frame with that same juggler, the amount of background included along with the juggler is greatly reduced.
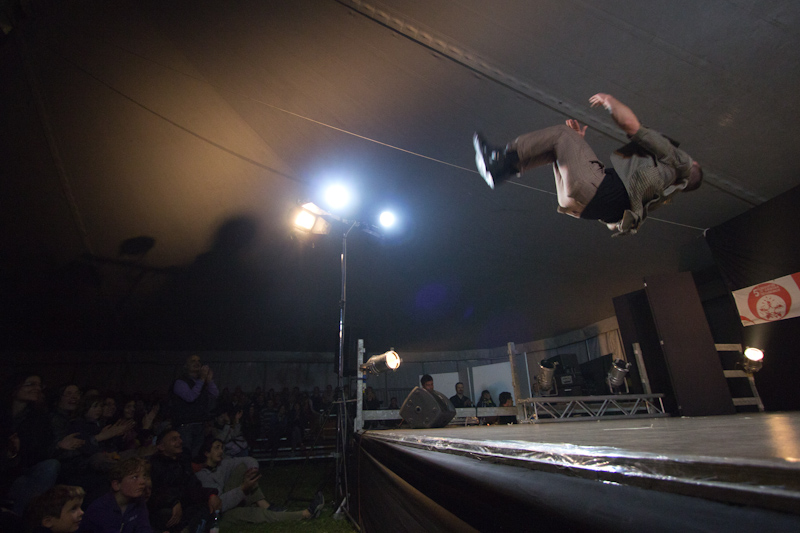
At rock concerts the lighting and backdrop is often part of the show. It adds to the atmosphere rather than intruding on the action. I take wide angle shots at juggling shows, but I usually do it to include the audience or some other factor, something that adds to the image rather than clutters it. For example, the reason I put the wide angle lens on to take the above photo of Wes is that I wanted to be prepared for the end of his act. I knew, when the applause arrived, that he’d do something acrobatic:
Another reason you don’t want to be right at the front is because the stage often cuts off the feet of the juggler from that angle. There is a line I don’t want to get below, and a photo like this is right at the edge of that line (look at the feet):

You can avoid cutting off the feet of the juggler by standing up with the camera… but if you are at the front you’re then in the way of everyone behind you, asshole.
Another reason you don’t want to be right at the front is because then you are looking up at the juggler. This can work sometimes, but do you want every photo show what’s up the nose of the juggler? No. I took this photo of the signing translator from that angle, because he was super close to me at the front, and he looked funny:
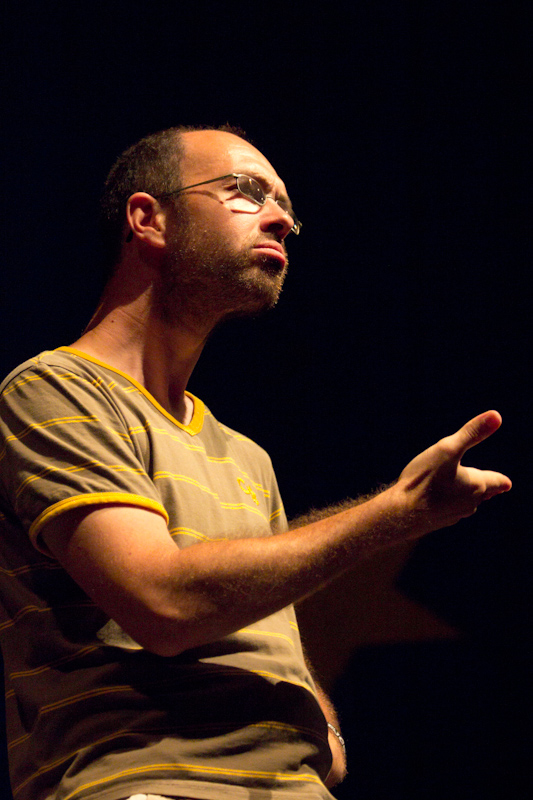
Later in the show I took this photo of the same guy. He still looked funny, but you can see the angle is way better for not-looking-up-your-nose angles.

Jugglers look up a lot. A lot. The more you can do to minimize looking at the underside of their chin, the better. Get away from the front of the stage!
So if I’m not at the front, where do I normally stand? Usually I stand at the sides, and a long way back away from the stage. As far around the side and as far away as I can get. If I need to zoom in I can walk forward, or just zoom in.
Some reasons:
- Jugglers normally face towards the audience while juggling, and look up. Instead of seeing the underside of their chin in the photo, I capture their profile or a half-profile. If they turn sideways I can get a direct shot. If they turn the other way, away from the camera, I can get an interesting over-the-shoulder photo of the pattern. If I stayed at the front I’d never have the option to take photos from behind.

- If there are two jugglers on stage together, they more often standing side by side rather than front to back. If I’m over on one side of them I can frame them up in far more interesting ways than they appear straight on to the audience. Check out the following photo and compare it to the photo of the same two jugglers I put above. In that photo (taken from directly in front of the stage) I had to rely on them coming close together on stage and arranging themselves into an interesting position. In this photo (taken from the side) I could move slightly to line them both up in the shot as far apart as I wanted:

- If I put on a wide angle lens I can fit in the entire audience too. For example, like this:

For an even more extreme example, this photo was taken by Juliane from on the stage itself:

Often the audience is a more interesting background than whatever is at the back of the stage. By showing some of the audience (if you can get the angle) the photo becomes unmistakably a recording of a live event, and not fake or posed. This photo was taken with a telephoto lens, but the fashion show catwalk meant I could get way around behind the action:

- Even if you can’t get the audience in the shot, the sides of the stage also make for a more interesting background for the action than a black or blank curtain or backdrop. This contradicts my advice about not including the lighting rig and keeping the attention on the juggler, but sometimes something in the background is better than nothing. At the Berlin Juggling Convention I had no options with the trapeze act, as they were at such a strange angle, up at the back, so they just got a blank background:

The acrobats, on the other hand, performed at the front. I could position myself so the performers were framed with the lighting rig down the side of the stage.

Which is the better photo? That’s up to you to decide, but I picked the second on as the cover photo for the Facebook album of that show. As long as the background is framing or complimenting the action, rather than intruding on it, you’ll have something way more interesting than a black backdrop.
In the end I try to strike a balance, and move around to keep up the variety, especially if my only job is to take photos (and I’m not in the show, nor wanting to simply sit in my seat to watch it). Sometimes being right at the front is the best place to be, like for a wide angle shot of the finale:

But that doesn’t mean you won’t find me behind the lighting and sound desks looking for a more interesting composition:

Or over the other side of the stage, getting a more intimate shot where you can see the magic working:
Fifth, editing:
Once you have all the photos from the show, it’s time for the most crucial step: editing. And by that I don’t mean post-processing or changing anything in individual photos themselves. Editing means cutting down the photos to a manageable number.
When I import my photos into Lightroom I give them all 1 star automatically. I then look through each in turn and give 3 stars to the ones I think are both technically good and interesting to look at. Then I go through all the 3 star photos again and remove as many as possible. Let’s talk numbers:
At the EJC this year I took just over 2,000 photos.
When I first started out with photography I was happy with 1 in 10 photos being technically proficient, and about 1 of those 10 being interesting enough to share. Starting with 2,000 photos and sharing 1 in 100 would leave me with 20 photos.
However, as I got better at photography, it got to the point where 5 in 10 photos were technically proficient, and then 9 out of 10. And as I got better, soon the majority of those photos were interesting enough to share.
So now, out of 2,000 photos, I could easily pick 1,000 technically proficient photos interesting enough to share.
But, they are only interesting in isolation.
It doesn’t matter if one photo is good, if it is next to five other photos of the same subject taken from the same angle, only the first of those six photos is interesting. The next five are still technically proficient, but if you look at them in order they are simply boring.
So, back to the editing part, once I have a folder full of 3 star photos, I’m not then downgrading “bad” photos to 2 stars, as the bad photos would never make the cut in the first place. Instead I’m removing duplicate shots of the same subject.
In the end I chose to narrow my original 2,000 photos down to 200. I picked 200 mainly because that’s the maximum number of photos allowed in a single Facebook album (or was the last time I checked). I could probably narrow it down much, much further, to just 100 images, but as I share the full resolution version of all my photos for the benefit of artists and jugglers (to use on their websites or promotional material (as long as they credit me)), I like to include a larger selection of show photos.
But if I did limit it to just 100 photos, or even 50, it would look like I’m an even better photographer than I am to those browsing the Facebook album. Instead of picking the best 10 photos out of the 60 I took of the EJC unicycle competitions, I’d pick just two. And they would be the most awesome two photographs.
Once again I want to strike a balance. I don’t take photos to show off how good I am at photography, I take photos to document the convention for everyone. If I narrowed my selection too far I’d exclude many people and events and acts that I’d like to share.
One of the best things to do though, when sharing photos online, is to be brutal in your editing. Never show two photos of the same person from the same angle with the same framing doing the same trick. Both photos might be “good”, but only you care that you got two good photos. Everyone else wants to see the best of those two photos, then let them move on to the next one. They don’t want a time-lapse record of what you saw while watching the show, they want to see the high point of each act visually, and then move on to the next act.
Set yourself a low number of photos at the start of the editing stage, then try to beat that number. I started with 2,000 photos and in the end shared 195.
Sixth, post-processing:
Once you have edited down from a big number to a small number of photos, it’s time to play with the levers and pulleys and nuts and bolts inside Lightroom or Aperture.
The RAW image will look a bit drab:

The first thing I do to all photos I take of juggling shows (I actually do it on import, before the editing stage) is to make them less drab. The basic import settings I use (in Lightroom 3) are:
- Increase Brightness to “50”.
- Increase Contrast to “25”.
- Increase Blacks to “5”.
- Turn Noise Reduction on. I set Luminance to “10” and Color to “10”.
This makes the subject of the photo (the artist on stage) pop out from the background. All that dark stuff in the background? That gets darker and less distracting. The colours are brighter and… well, it’s generally less drab.
As I said, I do this on import, so I never see the non-drab version. The Noise level is perfectly fine in this photos too, even though I took it at ISO 6400. That’s crazy high ISO, but I’ll just let Lightroom take care of it.
From then I wanted to make a few more tweaks.
First I cropped the photo slightly to get rid unneeded black space around the subject.
Second I fine tuned the exposure. Remember when I said I turn the exposure compensation on the camera down to -1? At this point I turned the exposure up again! In this case I set it to +0.7 to really bring back the light and colour I remembered from watching the show live.
Third I added a bit of a vignette to darken the corners a bit more, but it’s hardly noticeable in this photo.
In the case of this photo, that’s all the post processing it needed. Here’s the final image along with the original:
For the vast majority of the images, it only requires two or three steps. I crop the photo to taste, set a final exposure, then do a slight tweak like adjust the colour balance, add a vignette, boost the saturation or vibrance, etc. As I use a processing preset on import, ne that I know works with most show photos, I don’t need to worry about getting a good look from scratch, just playing with a formula I know already works.
And to make it even quicker, if I have multiple shots with the same lighting, I can copy settings from one photo to many others.
But I must make this clear again: I know what post processing adjustments I will make when I take the photo. Knowing that allows me to take better (read: less blurry) photos rather than trying to worry too much about making it perfect in the moment.
I very rarely use post processing to try to save a bad photo and make it good, instead I take a good photo knowing that what comes out of the camera is only the first step. The photo is only really finished once I export it from Lightroom.
That said, here’s one bad photo I took recently:

“Wait… that’s not a bad photo!”
No? Here’s the original:

I took it from my seat in the audience, so couldn’t move to a better position. The tent pole cut right across Wes’s rings. And Wes hadn’t caught his ring yet, so he was in a different “moment” to Patrik and Tony.
I cropped the photo down quite a lot:

But then there was a stage light half in and half out of the photo frame. That looks naff! I used the Spot Removal tool to duplicate a bit of black over the top of that light. And while I had a “clone-like” tool open, and because some friends were watching me edit the photo, I decided to copy some of the rings too. Why not? My memory of that moment in the show was that rings totally filled the stage! In the photos from half a second before this, the rings really did fill the stage! But Tony and Patrik weren’t in such a good position. Adding the rings in again is, in my opinion, a fun step. And now, after four days, that photo is one of the most liked in the entire Facebook album.
I often spot-remove lights or distracting things in the background of photos, but I don’t remember adding extra props into a juggling act before. This was just an example to show the most extreme I get when it comes to image processing… not very extreme, in other words.
Once I’ve finished doing all the processing, I go through and edit them down once again. If there are a few photos which are still a bit dull or uninteresting, I give them 2 stars, and they don’t make the final cut.
That’s it! That’s all I have to share about taking better photos of jugglers on stages. Now, if I’m on stage and someone with a half decent camera and lens is taking photos of me, they’ve got no excuse if the photos look shit.
I love to read comments and feedback about my blog posts. Please email me, I reply to every message: luke@juggler.net